Monday, October 20, 2014
Monday, August 25, 2014
recycled styrofoam tray printmaking
Free patterns: Hand embroidery – Needle Work
This post also goes along with things you can do with coloring pages and clip art.
Free patterns: Hand embroidery – Needle Work
here is another example of free patterns, embroidery sites, coloring book pages,
here is another example of free patterns, embroidery sites, coloring book pages,
Clip art and coloring book pages can be used for more than you think~ Just another Something Southernelle Idea!
Kids-n-fun | Coloring page Fish Fish
Before using any clip art etc, for making things to sell, you might want to make sure you have permission, or read info on page where you get it from...most people won't care if you just use it for personal use... This cute little fish coloring page can also be used to make a rubber stamp. You can also use it to make a mobile out of cardboard, Use it as a pattern to make wooden fish, or use it as a tattoo.Use it as a pattern to cut cute fabric out and applique it on fabric. or you could also cut it out of fabric or pretty paper and glue it to the wooden one you cut out of wood... Use the pattern to do embroidery! Use to decorate a card... even use this one to do a wood burning...some you can use for laser engraving also, or stencils, or for scroll saw patterns... and you can use them to do print making as well for multiple prints...You just have to "color outside the lines"! Now, Do you Get the Something Southernelle Idea?! Visit my Patterns page on Pinterest...just click on the Pinterest icon on the site...I have over 2000 pins you can choose from...and when you do and find a pattern you like, but don't know what all you can do with it...message me on pinterest and I will see what I can come up with! Here is a link that shows you how to make a rubber stamp in case you want to learn... I love doing them myself and you can buy the lino and other tools online at art supply stores and most hobby lobby stores carry them as well...just be careful those tools are very sharp... https://www.youtube.com/watch?v=i09a7zxrAnc hobbylobby.com you can search the stores and also sign up to get the 40% coupon! check out the printmaking post on this blog as well.
Before using any clip art etc, for making things to sell, you might want to make sure you have permission, or read info on page where you get it from...most people won't care if you just use it for personal use... This cute little fish coloring page can also be used to make a rubber stamp. You can also use it to make a mobile out of cardboard, Use it as a pattern to make wooden fish, or use it as a tattoo.Use it as a pattern to cut cute fabric out and applique it on fabric. or you could also cut it out of fabric or pretty paper and glue it to the wooden one you cut out of wood... Use the pattern to do embroidery! Use to decorate a card... even use this one to do a wood burning...some you can use for laser engraving also, or stencils, or for scroll saw patterns... and you can use them to do print making as well for multiple prints...You just have to "color outside the lines"! Now, Do you Get the Something Southernelle Idea?! Visit my Patterns page on Pinterest...just click on the Pinterest icon on the site...I have over 2000 pins you can choose from...and when you do and find a pattern you like, but don't know what all you can do with it...message me on pinterest and I will see what I can come up with! Here is a link that shows you how to make a rubber stamp in case you want to learn... I love doing them myself and you can buy the lino and other tools online at art supply stores and most hobby lobby stores carry them as well...just be careful those tools are very sharp... https://www.youtube.com/watch?v=i09a7zxrAnc hobbylobby.com you can search the stores and also sign up to get the 40% coupon! check out the printmaking post on this blog as well.
Sunday, August 24, 2014
My latest three pallet benches
Here are my latest three heavy duty bench I have finished...they were already blue but I decided to add a brighter color...blue and some orange around the nail and screw holes and in various places...I love them... hope you do too!
This is what they looked like before I added my own color.
And this is what they looked like after adding a lighter blue, brown and orange to them... I did some brown first, then the blue and then the orange...on the one I decided to only use red and blue...these are really heavy...they are not the cheap made pallets...in fact, I cannot pick one of the blue pallets all by myself...and I had to used the recip saw to tear them down...
And this is what they looked like after adding a lighter blue, brown and orange to them... I did some brown first, then the blue and then the orange...one the one I decided to only use red and blue...these are really heavy...they are not the cheap made pallets...in fact, I cannot pick one of the blue pallets all by myself...and I had to used the recip saw to tear them down...All of my creations of art, wood or craft are for sale...and check out my pinterest acct and my facebook acct. Thanks for checking my blog out...see you next time...
Friday, August 22, 2014
How to use a drill to make holes in wood and to screw in the screws.
I decided to take photos when I had to build a work table this time... because I know a lot of women haven't a clue when it comes to using tools...and who wants to wait til hubby has the time anyway! Hope this helps and doesn't confuse anyone!
This is a little tool I like to use, made by Ryobi..one end is used to drill the holes in the wood and the other end is for drilling the screw in the wood...you just flip it around. This little tool also cuts out a hole- called counter sinking the screw...that way the screw will be down in the wood...practice using it also...don't get the hole too deep unless you want it that way.
If you don't know how to put it in the drill I suggest you get someone to show you how to change bits and how to operate it...or you can go to youtube or google it.(I use Ridgid tools as I have used used many and I used to be the Home Depot tool lady so I know about tools...but whatever you or your hubby has works fine! I would suggest that if you are going to be doing any building much that you get your own set of tools...
You also need to know what size screws you need... I like to put a screw up to one piece of the wood I am using and make sure it goes all the way through that piece and into the other piece...
Also your bit you use to drive the screw in has to match the screw heads you will be using... for this project I used a Phillips head screw.
You also need at least two of these clamps as they are what I call my "helping hands" they hold your wood in place so it doesn't slip as you are screwing holes in the wood and drilling in the screws...again whatever you have is okay and learn to use them as well.
This is what you push in to release it...
And this is what you squeeze tightly to clamp it down!
Now, a little about the drill..it has a forward and a reverse...meaning it will screw the screw into the wood and if you make a boo boo...you can take it back out...but learn to hold the drill firmly and straight so you don't strip out the screw cause then you may never get it back in or back out. am I confusing you yet...hope not! This is the drill ready to put the screw in..the little black button facing you is sticking out...
when you push this little button in....then you can unscrew the screw. You then push the same little black button from the opposite side of the drill back in and you are ready to go again! I also need to mention that on my drill...it has numbers...and a mark that looks like a screw...the numbers are for torque...the higher the number means the drill is more powerful...I use it on a high number to make the screw hole ( it also has a flip button on top with a 1 and a 2...) I put it on 2 for making the holes...for screwing the screw in...I turn it too the screw emblem and a 1...you will learn which works best for you...
Now you are ready to make holes for your screws...decide where you want the screws to go...don't get too close to the edge but make sure the are as near to the center of the other board you are joining it too....you may want to practice on some scrap pieces of wood before trying this.
And this is what it looks like when you get the screws in.
I hope this has helped those of you who want to learn how to DIY!
I love my Ridgid tools and if you register them online...you get replacement for free for life! even the batteries...check them out at the Home Depot...
I also used the Ridgid cordless Reciprocating saw, The Ridgid cordless saw, and The Ridgid Sander to do this project...My next major tool will be the Ridgid Planner...it will plane wood up to 13 inches wide...means it will sand the wood smooth! You can sand before or after you are done...your choice...you will learn how to do it all...and decide what you like best...I have just made three pallet benches...and am almost done with the painting...will post that as soon as I get them done!
follow me on pinterest and you will see a lot of tools and videos as well as tips and hints...
Monday, August 4, 2014
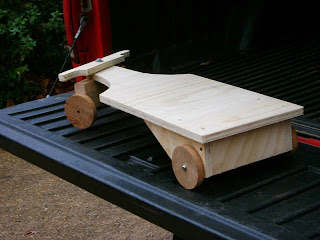
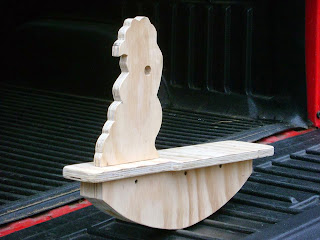
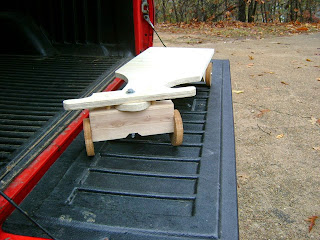
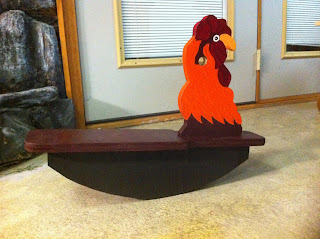
Reproduction Vintage Wooden Riding Toys
I found some old 1919-1930 patterns and fell in love with them! They were a little hard to understand...but with a few adjustments and help from a friend who was good at reading such, They turned out awesome! I haven't gotten them all painted but will re-post when I do. They include a rockin' rooster, a scooter, a kiddie car which looks like a tricycle and a coaster. These I made as decorative only because if I decide to sell them, they will be sold with that intention. They are so cute and little...I think they must have been made back then for preschool children. They would look great around a Christmas tree or sitting with some older toys in a group. They are totally movable and the steering parts work. The wheel are made from wood and on these, I used cedar. I hope you enjoy them.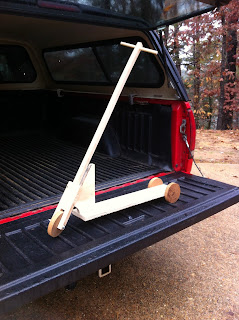.JPG)
+-+Copy.JPG)
.JPG)
+-+Copy.JPG)
.JPG)
.JPG)
.JPG)
.JPG)
+-+Copy.JPG)
.JPG)
+-+Copy.JPG)
.JPG)
.JPG)
.JPG)
Tuesday, July 22, 2014
MY FIRST ATTEMPTS AT MAKING PALLET FURNITURE
I DECIDED THAT SINCE I HAD SO MANY WOOD WORKING TOOLS...THAT I WAS USING TO REMODEL MY HOUSE BY MYSELF...I MIGHT AS WELL LEARN TO MAKE FURNITURE...I HAD NO CLUE HOW TO BEGIN...SO I TRIED USING A CROWBAR TO TEAR DOWN THE PALLETS...THAT WAS A NO GO...THEN I TRIED THE RECIP SAW AND ALMOST SHOOK MY SELF TO DEATH! SO I SAT THERE AND STUDIED THE WHOLE SITUATION...AND GOT OUT THE CIRCULAR SAW...LAY THE PALLET ON THE DRIVEWAY AND MADE A CHALK LINE AND PROCEEDED FROM THERE... I CUT THE ENDS OFF AND BEING CREATIVE...I SAW IMMEDIATELY HOW IT WOULD END UP...DID I MENTION I HAD USED ANOTHER PALLET TO BUILD MYSELF A WORK TABLE...TO MAKE PUTTING THE FURNITURE TOGETHER A LOT EASIER...CAUSE SQUATTING KILLS MY KNEES FOR LONG PERIODS OF TIME...AND I PLACED IT BESIDE MY ROLLING CARD WHICH HAS ALL MY CLAMPS AND SCREWS AND NAIL GUN ETC...IF YOU GET CONFUSED...THERE ARE THOUSANDS OF PHOTOS ON PINTEREST AS WELL AS OTHER SITES- SEVERAL YOU CAN FIND ON FACEBOOK OR GOOGLE THEM... HERE ARE JUST A FEW OF MY FAVORITE SITES---palletfurniturediy.com
99pallets.com
1001pallets.com also on facebook
Projeto Pallet on facebook
Pallet Furniture Plans on facebook
YOU NEVER KNOW WHAT YOU CAN CREAT UNTIL YOU TRY!
Tuesday, July 8, 2014
Yes, YOU CAN PAINT ON SLATE TILE WITH ACRYLIC PAINTS!
I decided to try my hand at painting on some slate tile... I just love the beautiful colors of slate. Clean you slate with water and let dry. Either sketch off a design or trace using white or light tracing paper. Lay out your craft paints and be sure to have some small brushes for tiny detail... you can use toothpicks for things like dots...just use your imagination. I am thinking about using a drill press to make a hole in mine so I can hang them with leather or wire.( will try it on a scrap piece first. They can also be used on your wall, follow grouting methods for this. Or you can just attach to different things or get small easels to sit them on. For these I used some bright leather acrylic paints... and when they were dry, I sealed them with a quality sealer made for slate tile, don't have the bottle handy but it was in a yellow bottle and it was a milky liquid. I applied two coats of this... it really brings out the colors of the acrylic and the slate itself. These are 4 x 4 in. tiles.
Hope you enjoy my slate tile creations...
https://www.facebook.com/media/set/?set=a.10200743159854020.1073741829.1612870355&type=1&l=5ca1d915e0
Subscribe to:
Comments (Atom)
.jpg)
.jpg)
.jpg)
.jpg)
.jpg)
.jpg)
.JPG)
.JPG)


.JPG)
.JPG)
.JPG)
.JPG)
.JPG)
.JPG)
.JPG)
.JPG)
.JPG)
.JPG)

.JPG)
.JPG)
.JPG)
.JPG)
.JPG)
.JPG)


.JPG)
.JPG)
.JPG)
.JPG)
.JPG)
.JPG)
.JPG)
.JPG)
.JPG)

